Close

🔒 Managing Client Restrictions and Visibility in Strive DB

Sometimes you need to make sure a client’s record is seen by as few people as possible—maybe they’re known to staff, involved in a sensitive case, or there’s a conflict of interest. That’s where Restrictions come in.

Restrictions allow you to lock down visibility on a client’s profile, limiting access to a specific list of authorized users. Here’s how it works.


🎯 Why Use a Restriction?

By default, your staff may be able to see any client records they have permission for. But what if a counselor realizes a new intake is her neighbor? Or a staff member is personally connected to a survivor?

In these cases, restrictions let you:

  • Prevent unwanted access to sensitive client records
  • Limit visibility to a specific, approved list of users
  • Document why that restriction is in place

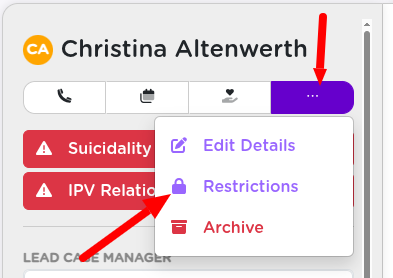
🧭 Accessing the Restriction Settings

To restrict a client, start from their profile. Open the meatball (…) and look for the “Restrictions” option.


🔧 Enabling the Restriction

Click the Enable Restriction button. You’ll be prompted to:

  • Provide a reason for the restriction (e.g., “Known to center employee”)
  • Select who is allowed to access this client’s data moving forward

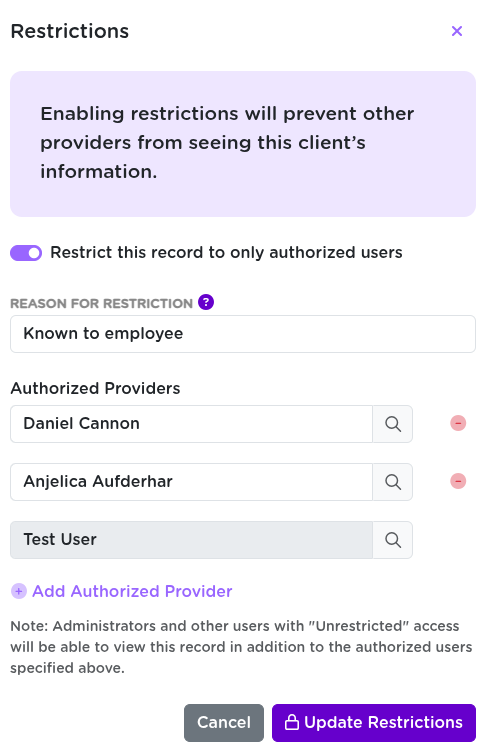
🧠 You’ll automatically be included on the access list when you set the restriction.


đŸš© What Happens Next

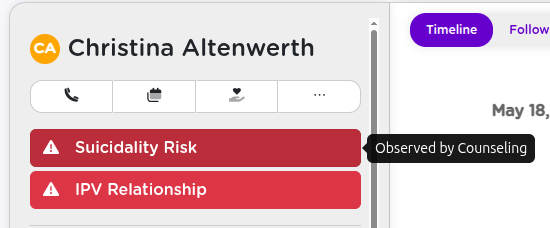
Once saved, a bold Restriction flag appears at the top of the client’s profile. This includes the restriction reason and serves as a visual warning to other users.

Anyone not explicitly listed will no longer be able to view or search for this client in the system.


đŸ‘ïž Managing Who Can See the Record

You can edit the restriction at any time to:

  • Add or remove authorized users
  • if circumstances change
  • Remove the restriction entirely when no longer needed

🔄 This gives you tight control while still being flexible as needs change.


🔗 Related Tools

  • Use intake info to identify sensitive clients early.
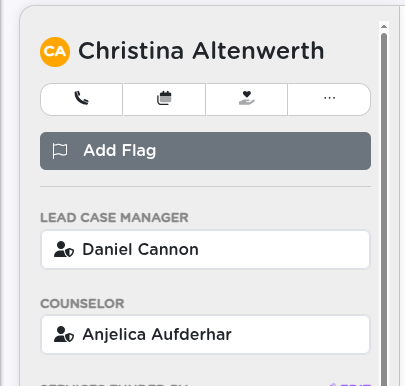
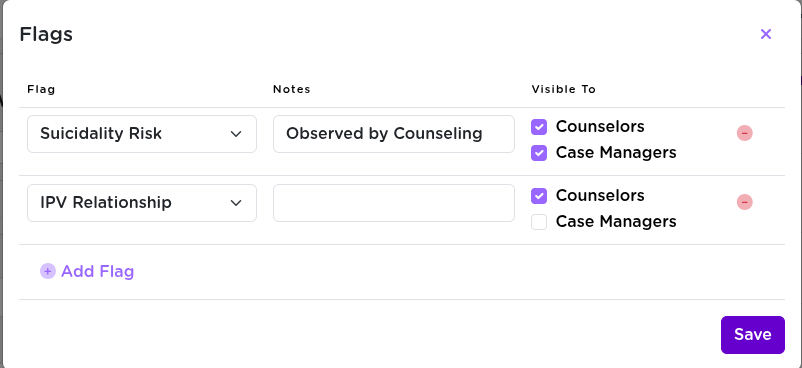
  • Combine with client flags to surface related concerns like suicidality or IPV.

🧠 Final Thoughts

Restrictions in Strive DB offer peace of mind when handling sensitive cases. They ensure only the right people have access, and help you document why those limits are in place. This is a crucial tool for maintaining survivor privacy and staff boundaries.

💬 Need help managing default permissions, visibility settings, or restriction review processes? Reach out to support—we’re happy to walk through it.

đŸš© Using Client Flags in Strive DB


Client flags are a high-visibility way to make sure important information doesn’t get buried. Whether it’s a safety concern, a behavioral note, or a clinical risk factor, flags help your team stay informed and make better decisions across departments.

This post covers how to create, manage, and control visibility of flags in Strive DB.


➕ Adding a Flag

From any client’s profile, click the “Add a Flag” button near the top of the page. This opens a form to enter the flag’s details.


🎯 Selecting a Flag Reason

You’ll choose a flag reason from a dropdown menu. Common examples include:

  • Suicidality
  • Homicidality
  • IPV Relationship

This label becomes the visible headline on the client’s profile.


📝 Adding Context

You can also include a note to provide more context—for example:

  • “Discussed in last session with counselor”
  • “Client has mentioned suicidal ideation in multiple check-ins”

🧠 Notes are especially useful for quickly conveying the source or recency of the concern.


🔐 Controlling Flag Visibility

Each flag has a confidentiality setting that determines who can see it:

  • Flags can be restricted to counselors only
  • Shared with case managers and counselors
  • Or visible to all staff with access to the profile

This lets you surface sensitive information to the right people without overexposing it.

🔒 Only users with proper permissions will see flags marked confidential.


đŸ‘ïž Where Flags Appear

Saved flags appear at the very top of a client’s profile—bold, color-coded, and impossible to miss (if you’re allowed to see them).

If a user doesn’t have permission to view a flag, they won’t see it at all.


🛠 Editing or Removing Flags

Flags are not permanent. You can:

  • Edit the flag reason, notes, or confidentiality
  • Remove the flag entirely if it’s no longer relevant

This keeps the client profile clean, current, and useful.


➕ Multiple Flags

You can add more than one flag per client. For example:

  • A Suicidality flag visible to counselors and case managers
  • And an IPV concern flag marked as counselor-only

This allows your team to track multiple concerns with different access levels, based on what’s appropriate for each role.


🧠 Final Thoughts

Client flags are one of the most visible and impactful ways to communicate risk and priority information across your organization. Use them thoughtfully, keep them updated, and lean on the confidentiality tools to strike the right balance between awareness and privacy.

💬 Need help configuring custom flag reasons or visibility rules? Reach out to support—we’ll walk you through it.

📁 Uploading and Managing Client & Case Documents in Strive DB

Strive DB makes it simple to keep all documentation organized, secure, and exactly where it belongs—whether you’re uploading a document tied to a specific case or attaching something directly to the client.

In this guide, we’ll walk through how to upload documents to both cases and clients, and how to view all files in one place from the client record.


🧭 Case vs. Client: Where Should Documents Go?

You can upload documents in two places:

  • From a Case – For documents tied to a specific incident, like a medical record or restraining order.
  • From a Client’s Profile – For general documents not associated with a particular case, like intake forms, signed releases, or ID copies.

[Insert screenshot: Client profile > Documents tab showing grouped files]

🧠 Think of the client’s Documents tab as a full document history across all cases and interactions.


📂 Uploading a Document to a Case

Step 1: Find the Case

Go to the Advocacy → Cases section. Search for and open the case you want to work with.

Step 2: Open the Documents Tab

Inside the case view, click on the Documents tab. This shows any files already uploaded to this case.

Step 3: Upload

Click “Upload a new document”, then:

  • Choose a Document Kind (e.g., Exam, Court Order, Counseling Form)
  • Select your file
  • Click Upload

✅ Once uploaded, the document will appear in the list for that case and also show up in the client’s master document view.


đŸ‘€ Uploading a Document to a Client

You can also upload documents directly to the client.

  1. Go to the People section and open the client’s profile.
  2. Click on their Documents tab.
  3. Click “Upload a new document”.
  4. Select a Document Kind and upload the file.

💡 Documents uploaded here may or may not tied to a specific case, but will still show up alongside case files in the same tab.


đŸ“„ Downloading & Viewing Documents

Click on any listed file to download it instantly. This works from:

  • The case-level Documents tab
  • The client’s master Documents tab

🧠 Best Practices

  • 🗂 Be consistent when choosing document types—this makes reporting and filtering easier.
  • 🔐 Respect privacy settings—only upload what’s appropriate, especially when not case-specific.
  • 🔍 Use the client’s Documents tab as your go-to for a complete paper trail.

🧠 Final Thoughts

Whether you’re attaching files to a case or uploading documents directly to a client, Strive DB keeps everything organized and accessible when you need it most. The full picture is always just a few clicks away.

💬 Have questions about file types, categories, or permissions? Reach out to support—we’re here to help.

đŸ“„ Completing an Intake in Strive DB

The intake process is one of the most critical parts of using Strive DB—and thankfully, it’s designed to be both thorough and intuitive. Whether you’re helping a new survivor or opening a new case for someone already in the system, Strive walks you through every step.

This post breaks down exactly how to complete an intake


🧭 Starting a New Intake

There are two main ways to begin a new intake:

  • From the People tab: click Start Intake next to an individual.
  • From the Cases table in the Advocacy tab: click Start Intake to begin from scratch.

đŸ‘„ New Client or Existing?

The very first step is deciding:
Is this for someone new, or for an existing client with a new case?

If you’re not sure, start typing their name. If they show up—great! You can associate the intake with their record. If not (e.g. no match for “Susan”), go ahead and create a new client profile.

💡 This keeps your data clean and avoids duplicates.


📝 Logging Intake & Incident Details

Next, you’ll enter the intake details and information about the incident. The form is comprehensive, but it’s all laid out clearly.

You’ll be asked to fill out:

  • Who did the intake – The primary advocate, and you can add as many secondary advocates as you want
  • Intake date, time, and location
  • Incident timing – when the incident happened, when the outcry occurred, who it was made to, and whether the date is estimated
  • Assault details – type of assault (e.g., domestic violence), presence of weapons, injuries
  • Assault location – the general location type and ZIP code (auto-fills city/county/state)
  • Client circumstances at the time
    • Martial Status
    • Pregnancy
    • Living Arrangement
    • etc
  • Police report details (if applicable)
    • You can also add police officers
  • Sequence of events as told by the client

✅ These fields ensure everything from funder requirements to legal documentation is captured in one pass.


đŸ‘€ Adding the Survivor / Client

If you didn’t connect this intake to an existing client earlier, now’s the time to create their profile. You’ll be prompted to enter:

  • Full name, along with any other legal names
  • Birth date (automatically calculates age)
  • Gender, race, ethnicity, and tribal affiliations
  • Barriers the client may be facing (e.g., substance use, housing insecurity)
  • Incarceration status at the time of intake
  • Addresses – multiple can be added, and ZIP code lookups will autofill city, county, and state
  • Phone numbers – you can add multiple; each one includes a “safe to contact” checkbox 🔒
  • Email addresses – also support multiple entries, each with a “safe to contact” setting 🔒
  • Referral details and general notes

🔒 The “safe to contact” setting helps ensure client privacy. If a number or email is not marked safe, it will marked that way and require extra steps to access


🔎 Adding the Assailant (Perpetrator)

Next up: documenting the asalant.

  • First, specify the relationship between the survivor and the assailant (e.g., “acquaintance”).
  • Search for the assailant to avoid duplicates. If they’re not found, you can create a new assailant record.

For new entries, you’ll input:

  • Name and birth date (or approximate age, which auto-generates a birth year)
  • Physical details – height, age range, tattoos, hair, clothes
  • Vehicle info – license plate, model, etc.

🧠 The more you can fill in here, the stronger your records (and reports) will be later.


✅ Completing the Intake

Once you’ve filled out everything about the survivor and the asalant, hit Next—this wraps up the intake and officially creates the record.

You’ll land on the new intake’s detail page, where you can continue working.


📎 After the Intake: What’s Next?

From the intake page, you can now:

  • Add related Investigations
  • Upload Medical Exams
  • Attach Documents
  • Add more assailants or secondary victims
  • Go back and edit anything you previously entered

🔄 Nothing is locked—you can always update, expand, or correct the info later.


🧠 Final Thoughts

The Strive DB intake process is built to handle real-world complexity while guiding you through it step-by-step. It ensures you capture everything you need while keeping client safety and data clarity front and center.

💬 Have questions about any field or how something flows? Reach out to support—we’re happy to walk through it with you.