Close

🔁 Managing Follow-Ups in Strive DB

Follow-ups in Strive DB act like powerful, context-aware to-do items. Whether you’re reminding yourself to call a client, assigning a follow-up to a teammate, or tracking next steps after a session, the follow-up system keeps things organized and actionable.

This post walks through how follow-ups work, where to find them, and how to get the most out of them in daily use.


🧭 Viewing Your Follow-Ups

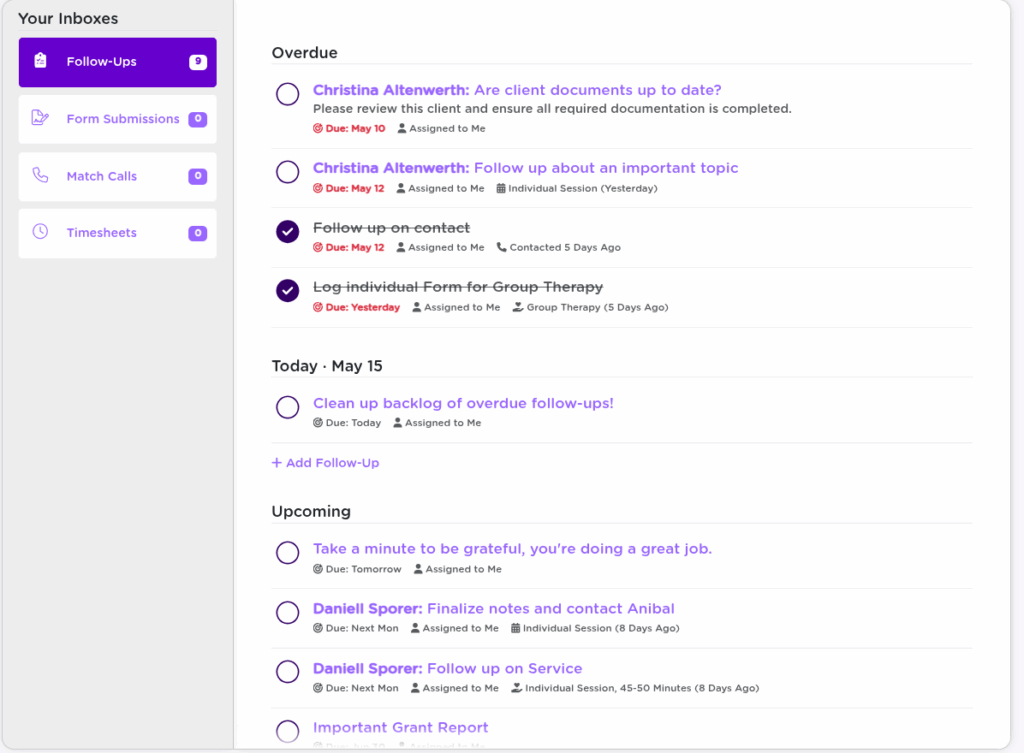
Most users start their day in the Inbox, which includes the Follow-Ups panel. This area is divided into sections like:

  • Today
  • Tomorrow
  • This Week
  • Past Due (if any)

Each follow-up shows the assigned user, linked client (if any), and a short summary of the task.

🔗 New to the Inbox? Check out our Strive DB Overview.


đŸ§Ÿ Types of Follow-Ups

Strive DB supports several types of follow-ups, depending on where they’re created:

  • Standalone reminders – General tasks like “Email team” or “Check voicemail”
  • Client-related – Follow-ups tied to a specific survivor
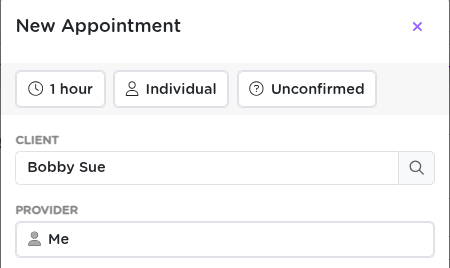
  • Appointment-based – For example, scheduling a follow-up after a no-show
  • Service-related – Reminders to complete documentation or follow up on a provided service

💡 You’ll always know the context of a follow-up by the icon and linked record it shows.


✅ Completing a Follow-Up

Just click the checkbox next to any follow-up to mark it as complete. If the follow-up is tied to another action (like logging a service), completing that task may also mark the follow-up complete automatically.


đŸ‘„ Assigning Tasks to Others

You’re not limited to your own list—follow-ups can be assigned to other users in your organization. This makes it easy to hand off next steps, coordinate care, or route follow-ups to admins or supervisors.

🧠 Assigned follow-ups show in that person’s inbox and also remain visible to users with the right permissions.


🔗 Follow-Ups with Context (Client, Appointment, or Service)

When a follow-up is tied to another record, Strive gives you convenience tools right from the follow-up:

  • Client – Quick link to contact, schedule, or review their profile
  • Appointment – Reschedule or log an outcome
  • Service – Complete required documentation


📝 Editing Follow-Up Details

Need to adjust something? Click into the follow-up to:

  • Change the due date
  • Reassign the task
  • Add or update notes
  • Modify the linked record (in some cases)

📍 Where Else Follow-Ups Show Up

Follow-ups don’t just live in your inbox. You’ll also find them in places that make sense contextually:

  • Client profile → Follow-Ups tab – See all tasks tied to that person
  • Appointments tab – View team-wide follow-ups related to scheduled sessions
  • Service records – View or add follow-ups directly from logged services

🔗 Want to see how appointments tie in? Check out our Appointments Guide.


🧠 Final Thoughts

Strive DB’s follow-up system is more than just a checklist—it’s a flexible, collaborative tool that keeps critical tasks visible and actionable. Whether you’re managing your own caseload or coordinating across a team, follow-ups help make sure nothing slips through the cracks.

💬 Need help building a workflow around follow-ups? Reach out to support—we can help configure it to fit your team.

Completing one of these related actions can automatically complete the follow-up as well.

📅 Managing Appointments in Strive DB

Appointments in Strive DB aren’t just calendar events—they’re the backbone of scheduling, documenting services, and staying compliant with your organization’s workflow. Whether it’s a counseling session, advocacy check-in, or group meeting, the appointment system helps you handle it quickly and cleanly.

This post walks through how to create, manage, and follow up on appointments, based on the training video.


🧭 Accessing the Appointment Scheduler

There are two main ways to schedule a new appointment in Strive DB:

  • From the top convenience bar, click “Schedule” — available from anywhere in the system
  • From a client’s profile, click “Schedule Appointment” to auto-fill that client into the form

💡 Starting from a client’s profile saves time and avoids duplicate searching.


📝 Setting Appointment Details

At the top of the appointment form, you’ll configure the key details:

  • Duration – Choose how long the session will be
  • Type – Individual or group appointment
  • Status – Tentative, confirmed, cancelled, etc.
  • Provider – Defaults to you, but can be reassigned to another staff member

✅ Keeping appointment statuses updated helps other team members know what’s coming up.


📆 Selecting a Date and Time

Use the built-in calendar widget to find available times. It shows:

  • Which days have openings (based on your availability settings)
  • Time slots on a selected day
  • Real-time updates so you don’t accidentally double-book

Once you find the right slot, click it and continue.


📍 Adding Location & Notes

Next, include optional but helpful context:

  • Location – e.g., “Zoom”, “Room 2”, or “Off-site”
  • Note – Any notes you want visible to team members viewing the appointment

đŸ’Ÿ Saving the Appointment

Once everything’s filled out, click Save.

You’ll be taken directly to the appointment’s detail page, where you can:

  • Review or edit the info
  • Add session notes
  • Start follow-up tasks right away

🔁 Managing Appointments After Creation

Once the appointment has occurred—or not—you’ll want to log the outcome. From the appointment’s page, you can:

  • Mark attendance status (e.g., Attended, Late, No-show)
  • Add a Follow-Up Reminder
  • Attach a Counseling Session, often using a session-specific form
  • Edit/reschedule the appointment as needed

🧠 This workflow ensures your services are recorded accurately and quickly tie into reports and grant tracking.


🔍 Viewing Appointments

From the Appointments tab, you can:

  • View daily or weekly schedules
  • Filter by staff member, client, or service type
  • Switch between list view and calendar view
  • Jump to a date or scroll ahead for upcoming work

📎 Linking Appointments to Case Work

Appointments automatically connect to:

  • Client profiles – full appointment history and documentation
  • Staff/provider records
  • Service logs – when tied to session forms
  • Reporting – all outcomes and durations feed into organizational data

This means nothing gets lost and everything you log stays tied to the broader support picture.


🧠 Final Thoughts

Appointments in Strive DB aren’t just boxes on a calendar—they’re fully integrated records of service. They help you track what happened, stay on schedule, and document the critical work you’re doing.

💬 Need help setting up availability or figuring out provider scheduling? Reach out to support—we’ve got your back.